This tutorial explains a simple way of creating a fitness related logo using mostly shapes. The final result of this Photoshop tutorial can be seen below.

To begin, create a new file and a layer by pressing shift+ctrl+n together. Press âUâ or click on Auto Shape tool and select the Rectangle Tool and drw a simple rectangle.

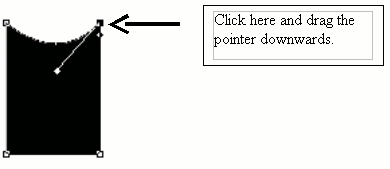
Click and hold the mouse on the Pen Tool Pallete and select the Convert Point Tool.

Follow the steps below to tranform the rectangle.


Now you should have a shape like the one below.

This is the base or body of our imaginary character who is exercising. Now we want to add hands, legs and a head to our character. To add the head select the Ellipse Tool from Auto Shapes and draw a circle above the body of our character. Slightly rotate the circle to have a moving look.

Select Ellipse Tool again to draw the hands. Duplicate and rotate it and place it as shown in the screenshot below.

Again with the help of Ellipse tool, draw and place the a new ellipse just over the head of our character.


very good
I dont get the thing over the head?? This was wierd, not very nide either:S
Very Nice.
I wish to be so creativ.
Greetings from germany
Not to mention that the character looks like he needs to be at the gym. How motivating!
NEVER create a logo in photoshop.. NEVERRR!!!!!!!!!!!!!!!!!!!!!
I agree, but I don’t have a site about illustrator tutorials yet
The “thing over the head” is the left arm, idiot.
The funny part is that the guy in the logo is fat lol!
Corel is best qualifyly
awesome and very easy to follow! Good job
Well Done!
Is there a .psd awalible somewhere?